
DevAgent Admin Workspace Documentation
Install, configure and operate DevAgent Admin Workspace 1.0.0. This guide covers roles and permissions, workspace dashboards, quick actions, administrative menus, assignments, effective menu verification, recovery, privacy and troubleshooting.
Plugin version 1.0.1 · Updated August 2026
Requires WordPress 6.8+ and PHP 8.1+. No external account, license or runtime service is required.
Quick start
Use this sequence to prepare a role, create a workspace and validate the result before assigning it to production users.

Install and activate
Upload the plugin ZIP, activate DevAgent Admin Workspace and review the local Diagnostics screen.
Prepare a role
Create or duplicate a custom role, then grant only the capabilities required for the user’s responsibilities.
Build a workspace
Configure the start page, dashboard blocks, quick actions and administrative menu, then publish the workspace.

Assign and verify
Assign the published workspace to a role, test with a real non-administrator user and review the browser-rendered menu result.
On this page
1. Requirements
Before installing DevAgent Admin Workspace, confirm that the site meets these requirements.
Multisite:
Each site stores its own workspaces, assignments, settings and logs. Network activation initializes sites, but version 1.0.1 does not provide network-wide workspace management or synchronization.
2. Installation and activation
2. Installation
Log in to WordPress with an account that can install and activate plugins.
Go to Plugins > Add New Plugin > Upload Plugin.
Select the DevAgent Admin Workspace ZIP file and choose Install Now.
When installation finishes, choose Activate Plugin.
Open Admin Workspace in the WordPress administration menu.
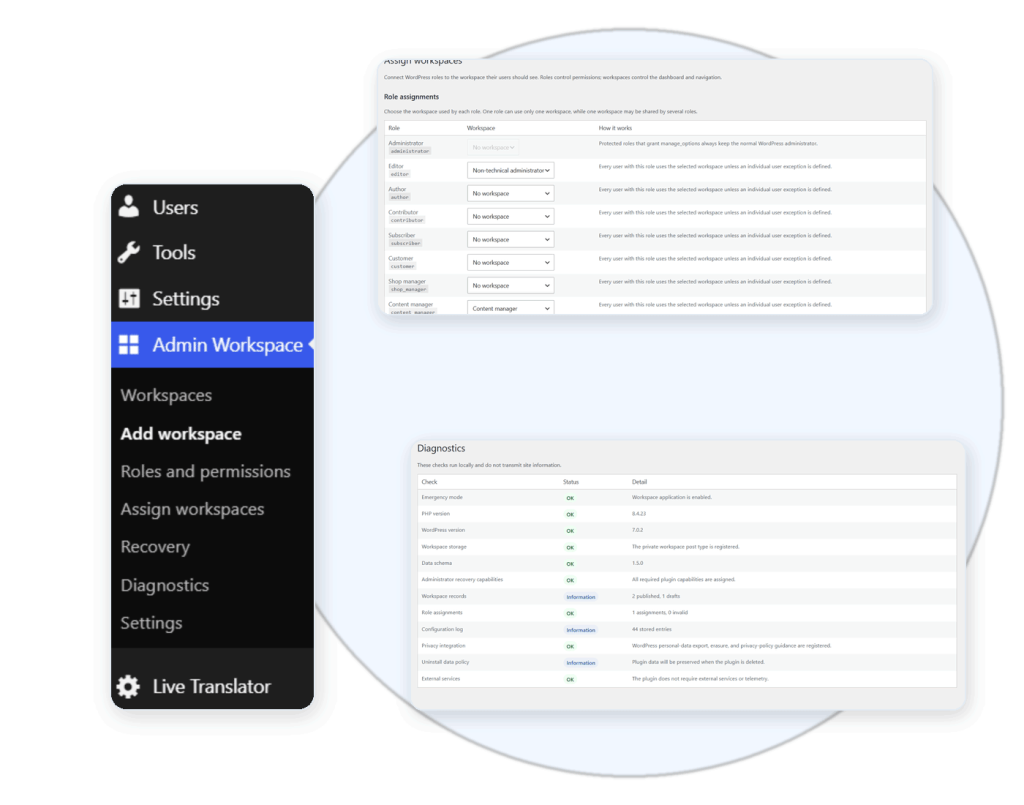
Confirm that Workspaces, Roles and permissions, Assign workspaces, Recovery, Diagnostics and Settings are available.
Open Admin Workspace > Diagnostics and confirm that PHP version, WordPress version, workspace storage, data schema and administrator recovery capabilities do not report an error.
3. Core concepts and security model
Add Your Heading Text Here
A WordPress role determines what a user is allowed to do. DevAgent Admin Workspace can create and edit custom roles, but the final authorization decision remains with WordPress and the plugin that owns each screen or action.
Workspaces control presentation
A workspace organizes the user’s administration experience: its start page, dashboard blocks, quick actions and administrative menu. A workspace does not grant permissions.
Draft and published workspaces
- Draft workspaces can be configured and previewed, but they cannot be assigned to users.
- Published workspaces can be assigned to roles or individual users.
- Deactivating a published workspace returns it to draft status and prevents it from being applied.
One configuration, role-specific result
Several roles can share one workspace. The configured menu is shared, but each role may see a different effective result because WordPress capabilities and plugin-specific conditions differ. Create separate workspaces when roles need genuinely different menu structures.
Runtime behavior
- After login, an eligible user is redirected to the workspace start page after the plugin resolves the applicable workspace.
- The native Dashboard entry is replaced by the workspace entry for users who receive a workspace.
- An invalid or unavailable start page falls back to the workspace dashboard.
- Emergency mode can disable workspace application without deactivating the plugin.
4. Recommended setup workflow
Define the target user’s responsibilities and identify the WordPress capabilities required for them.
Create or duplicate a custom role under Admin Workspace > Roles and permissions, or start from a template.
Create a workspace under Admin Workspace > Add workspace.
Configure its start page and dashboard.
Publish the workspace.
Assign it to the target role under Admin Workspace > Assign workspaces.
Return to the workspace editor and configure the Administrative menu using the assigned role as the preview context.
Log in with a real non-administrator test user who has the assigned role and open a normal wp-admin screen.
Return as an administrator and review the browser-rendered verification result.
Test login redirect, dashboard blocks, quick actions, direct screen access, content permissions, menu behavior and a new login session.
Deploy the assignment to production users only after the real-user test is complete.
5. Roles and permissions
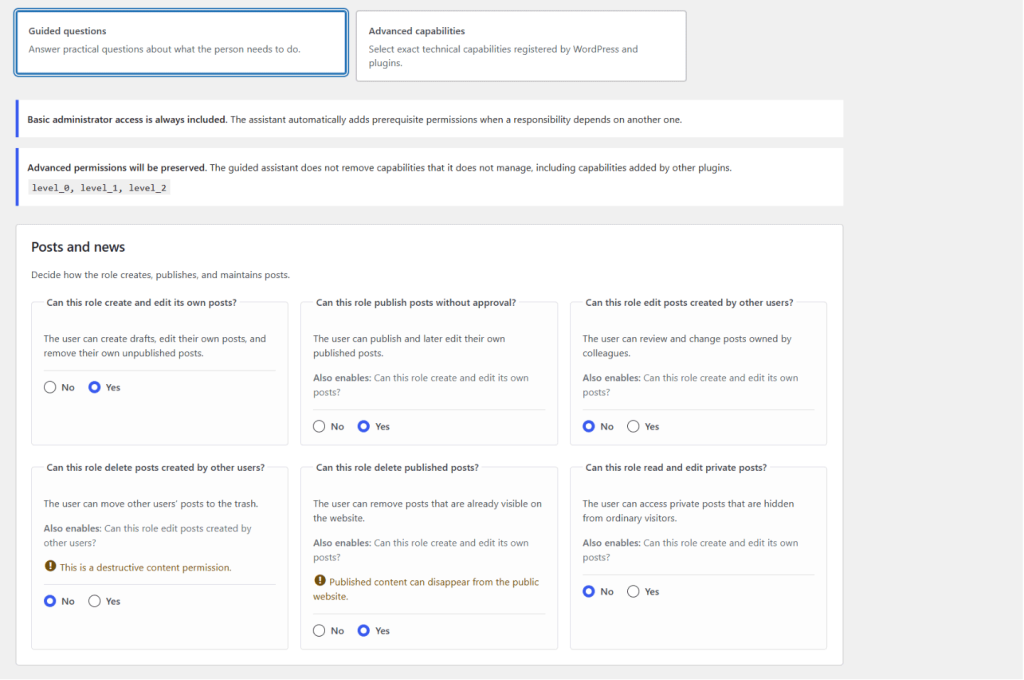
Guided questions for practical role-permission configuration.
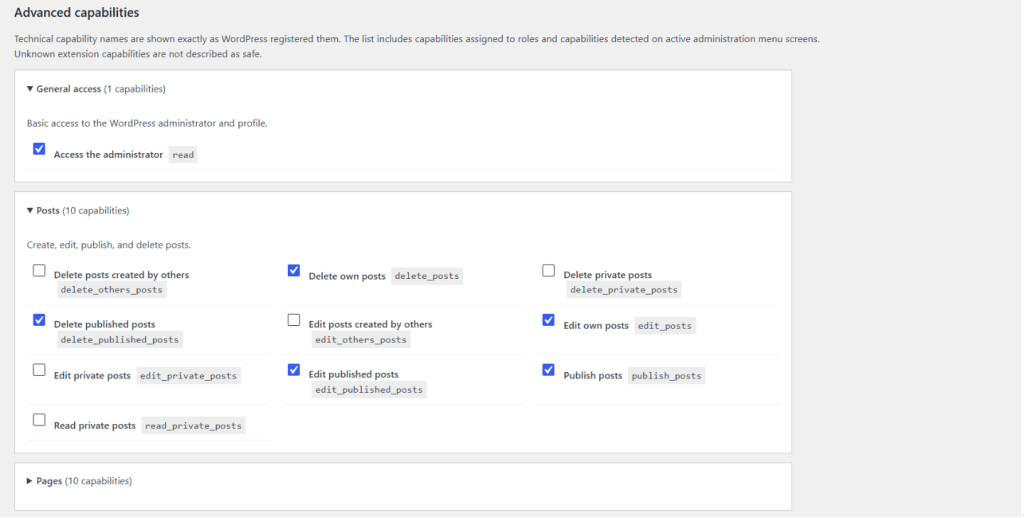
Advanced capabilities view with exact WordPress capability identifiers.
Open the role manager
Go to Admin Workspace > Roles and permissions. The list shows each role’s display name, technical slug, user count, capability count and origin. Roles created by WordPress or another plugin remain visible, but only roles created by DevAgent Admin Workspace can be deleted from this interface.
Create a role
Choose Add role.
Choose Start from scratch or select a suggested template.
Enter a human-readable Role name.
Enter a Technical slug using lowercase letters, numbers, underscores and hyphens. The slug cannot be changed later.
Choose Guided questions or Advanced capabilities.
Review the permission summary and any sensitive-capability warning.
Choose Create role or Save permissions.
Guided questions
The guided assistant converts practical yes/no answers into WordPress capabilities and includes prerequisites when one responsibility depends on another. It covers posts, pages, media, comments, categories, users, privacy tools, theme options and site settings. Capabilities added by other plugins and not managed by the assistant are preserved when an existing role is edited.
Advanced capabilities
Use the advanced view when an extension requires capabilities that are not covered by the guided assistant. Known WordPress capabilities include descriptions and security classification. Extension capabilities may appear only by technical identifier and are not automatically classified as safe. The plugin does not scan third-party source code or guarantee discovery of AJAX, REST, background-action or dynamically calculated permissions.
Sensitive capabilities
Newly granting sensitive capabilities requires explicit confirmation. Examples include user creation or deletion, role promotion, privacy tools, manage_options, theme or plugin management, core updates, unfiltered uploads or HTML and the plugin’s own configuration capabilities.
Edit, duplicate and delete roles
- Edit: change the display name and capabilities; the technical slug remains fixed.
- Duplicate: create a new editable role based on the selected role.
- Delete: available only for roles created by DevAgent Admin Workspace when no users are assigned and the role is not protected.
- Administrator: visible for reference but cannot be modified or deleted by the Lite interface.
6. Templates
Templates create an editable custom role or a draft workspace. They never overwrite an existing role or workspace, and every capability, block, quick action and menu choice remains editable.
| Template | Purpose | Starter menu |
|---|---|---|
| Content manager | Manage posts, pages, media, categories and comments without site configuration | Dashboard, Posts, Pages, Media, Comments |
| Restricted editor | Create and edit personal drafts while publication remains under review | Dashboard, Posts, Media, Profile |
| Media manager | Upload and organize media with restricted editorial and settings access | Dashboard, Media, Profile |
| Content reviewer | Review colleagues’ content and moderate comments without broad administration access | Dashboard, Posts, Comments, Profile |
| Site client | Provide a simple read-oriented console with support information | Dashboard, Profile |
| Non-technical administrator | Broad content and user oversight without manage_options, plugins, themes or update permissions |
Dashboard, Posts, Pages, Media, Comments, Users, Profile |
To use a template, open Admin Workspace > Templates, review its suggested capabilities and workspace content, create a uniquely named role or draft workspace, then adapt it before publishing or assigning it.
7. Creating and editing a workspace
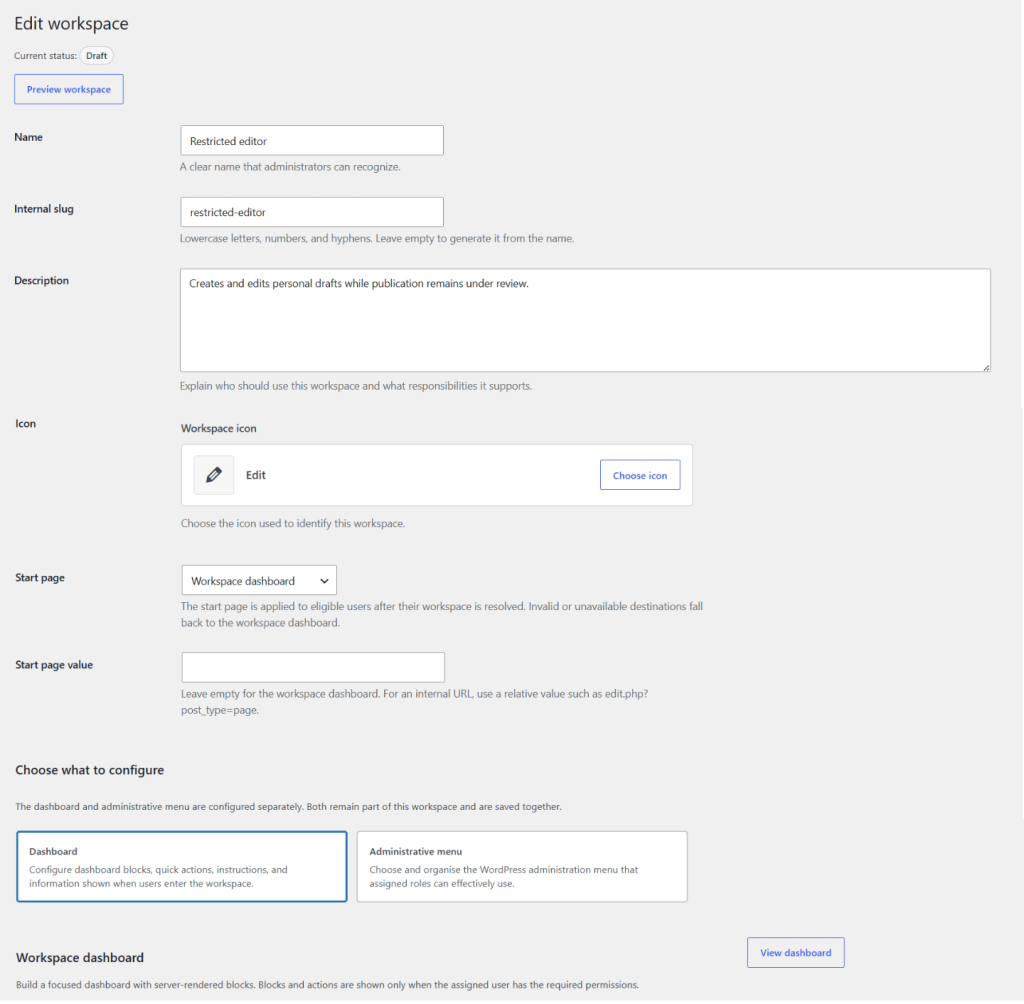
Workspace editor with status, identity, start page and configuration choices.
Go to Admin Workspace > Add workspace.
Choose Empty workspace or a suggested starting layout.
Enter a recognizable Name.
Enter an Internal slug using lowercase letters, numbers and hyphens, or leave it empty to generate it from the name.
Add a Description explaining the audience and responsibilities.
Choose a Dashicon.
Select the Start page type and enter its value when required.
Configure the Dashboard and Administrative menu tabs.
Choose Save draft or Publish workspace.
| Field | Use |
|---|---|
| Name | Human-readable administrative name |
| Internal slug | Stable internal identifier |
| Description | Internal explanation of audience and responsibilities |
| Icon | Dashicon used to identify the workspace |
| Start page | Destination applied after workspace resolution |
| Dashboard | Blocks, quick actions, instructions, links and information |
| Administrative menu | Intended visibility, labels, order, groups, links and role-aware verification |
8. Start page behavior
The start page is used after the plugin resolves an eligible user’s workspace. Invalid or unavailable destinations fall back to the workspace dashboard.
| Start page type | Configuration |
|---|---|
| Workspace dashboard | No value is required |
| Administrative screen ID | Enter a valid WordPress administration screen identifier |
| Internal administration URL | Enter a relative wp-admin path such as edit.php?post_type=page; external URLs are not accepted |
Confirm that the destination is internal, available, authorized for the assigned role and registered by its owning plugin. Always test it with a real user after publishing and assigning the workspace.
9. Dashboard builder and quick actions
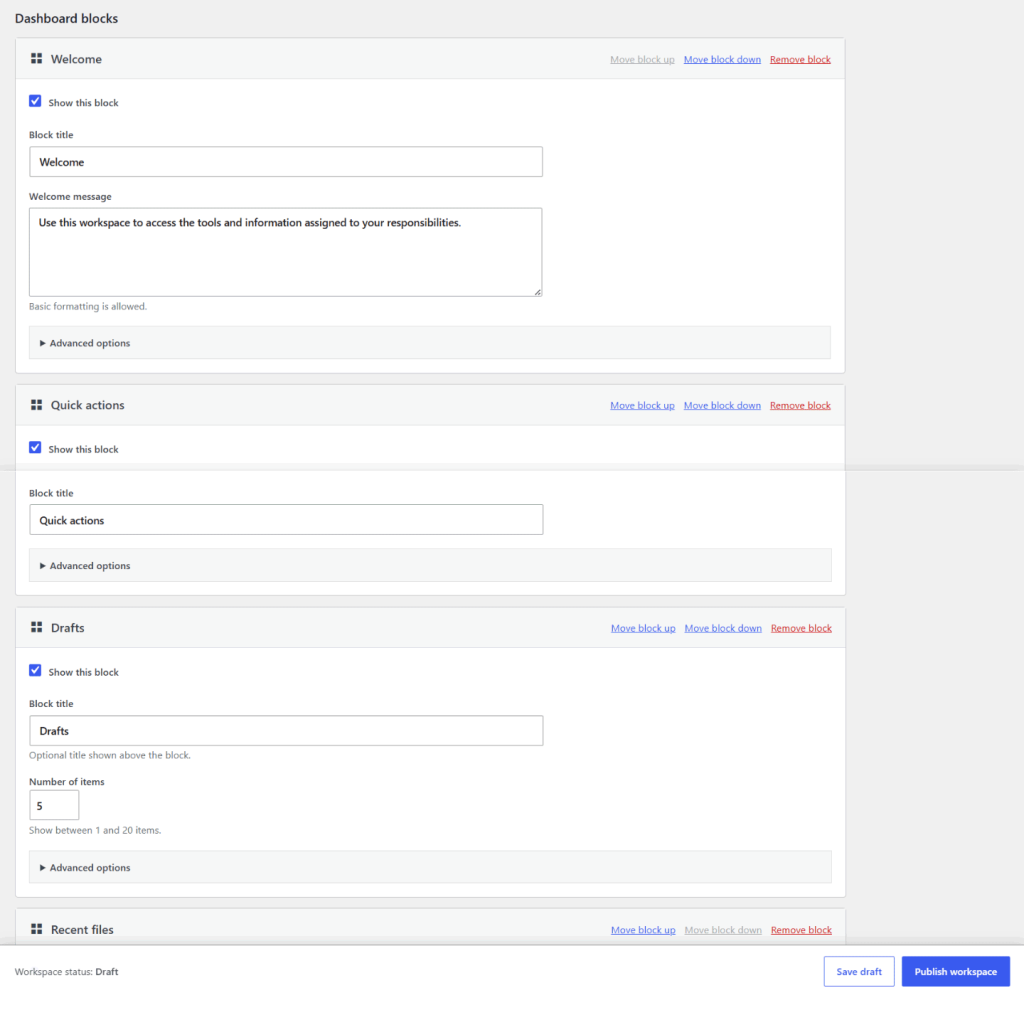
Dashboard builder with blocks, visibility, ordering controls and publishing actions.
Dashboard blocks
Label | URL entry per line. The starter layout restores Welcome, Quick actions, Recent posts and Contact and support. Quick actions
Quick actions open permitted administrative tasks and resources. Each action checks its normal WordPress permission when the dashboard is rendered. An optional extra capability can only make it more restrictive.
In the Dashboard tab, open Quick actions and choose Add action.
Select an action type.
Enter the label and optional description.
Choose a Dashicon.
Complete the destination field when required.
Keep No extra restriction unless a specific additional capability is necessary.
Keep the action active, arrange its order and save or publish the workspace.
Action types include Create a post, Create a page, Open media library, Edit specific content, Internal administration screen, Plugin screen and External URL. A workspace can contain up to 50 actions.
Do not use quick actions as permission controls
A button may be hidden when a permission is missing, but WordPress capabilities remain the real access control.
10. Administrative menu and effective verification
Establish a role context
Publish the workspace, assign it to an eligible role, return to Edit workspace > Administrative menu and select the role whose effective menu you want to review.
Configure navigation
http:// or https:// URL. New screens detected after adding a plugin are not enabled automatically. Stored screens that are no longer registered remain in the configuration and are reported as unavailable.
The reset control removes custom labels, hidden states, sections, links and ordering. Review the result before saving or publishing. Refresh effective menu verification
Save or publish the menu configuration.
Log in with a real user who has the selected role and assigned workspace.
Open a normal wp-admin screen and wait until the menu finishes loading.
Return as an administrator.
Open the workspace editor and select Administrative menu.
Review the result for each item and menu family.
| Status | Meaning |
|---|---|
| Visible to this role | Configured to show and confirmed in the rendered menu |
| Hidden by workspace | Intentionally disabled by the workspace |
| Pending verification | No compatible browser result exists for the current setting |
| Configured, not shown | Configured to show, but absent in the last browser check |
| Not available to this role | The role lacks the declared capability |
| Not currently registered | The stored item is absent from the currently captured menu |
| Partially shown | A family contains confirmed visible and absent child items |
| Partially verified | Some items are current while others still need verification |
A third-party plugin may conditionally register or remove a screen, require additional permissions, depend on a parent menu or hide an item later with CSS or JavaScript. The workspace can report the difference but cannot override the plugin’s access logic.
11. Assigning workspaces
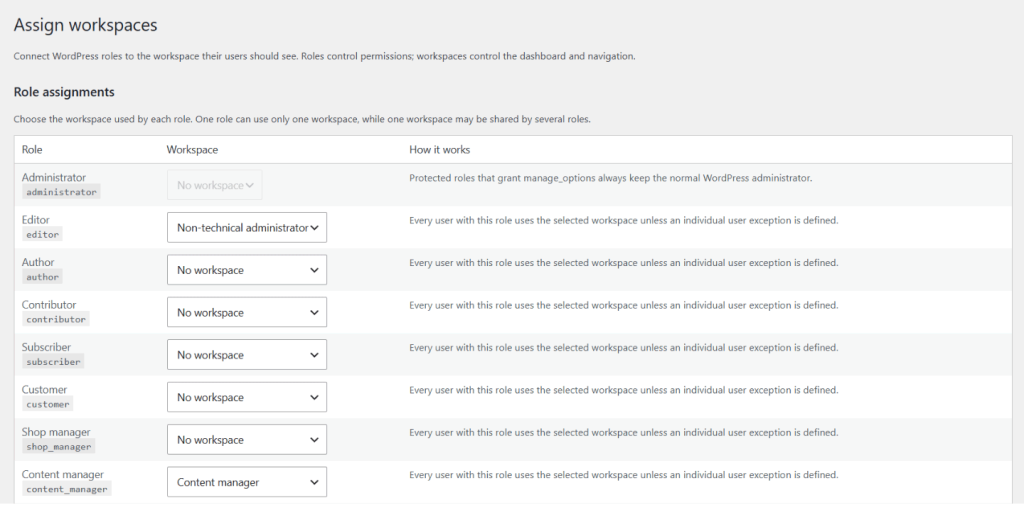
Role assignments connecting eligible WordPress roles to published workspaces.
Role assignments
Go to Admin Workspace > Assign workspaces, choose one published workspace for each eligible role or No workspace, save the assignments and test with a real user.
One role can use only one workspace. One workspace can be shared by several roles. Every user with the role receives the workspace unless an individual exception exists. Roles that grant manage_options keep the normal WordPress administrator.
Users requiring review
When a user has multiple roles that point to different workspaces, the screen lists the user under Users requiring review. WordPress role order determines the current result, but an individual exception is recommended to make the intended workspace explicit.
Individual user exceptions
Search for the user, select an individual published workspace or choose Use role assignment to remove the exception, then save and test the account. Exceptions change presentation only; they do not change roles or permissions.
12. Previewing, testing and production deployment
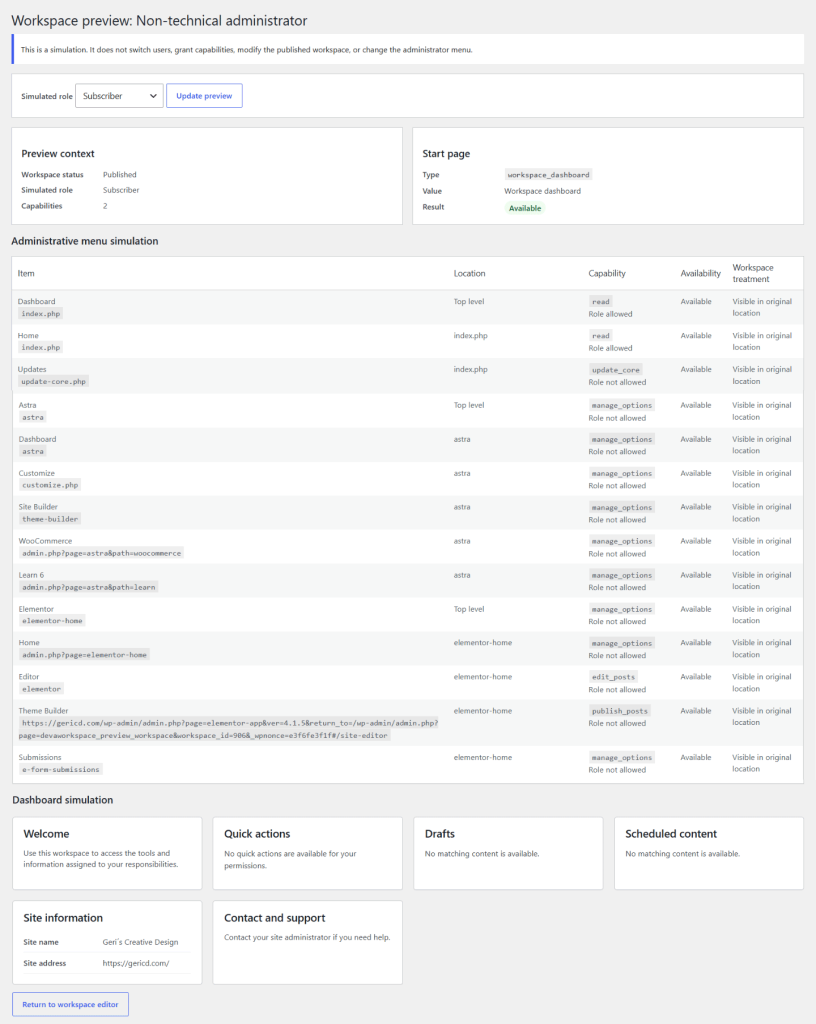
Protected workspace preview with simulated role, menu and dashboard results.
Protected workspace preview
Choose Preview workspace, select a simulated role and review the workspace status, capability count, start page, sensitive capabilities, dashboard and menu simulation. Preview does not switch users, grant capabilities, modify the workspace or change the administrator’s menu.
Real-user test
Use a non-administrator account with exactly the intended role combination. Test the login redirect, start page, dashboard blocks, quick actions, native and custom menu items, permitted direct URLs, denied direct URLs, content actions, menu verification refresh and behavior after logout and login.
Production checklist
Before deployment, confirm requirements, Diagnostics, role capabilities, sensitive-capability approval, published assignment, start-page access, dashboard actions, rendered menu verification, direct URL behavior, multi-role users, recovery snapshot, emergency procedure and uninstall data policy.
13. Workspace lifecycle, recovery and diagnostics
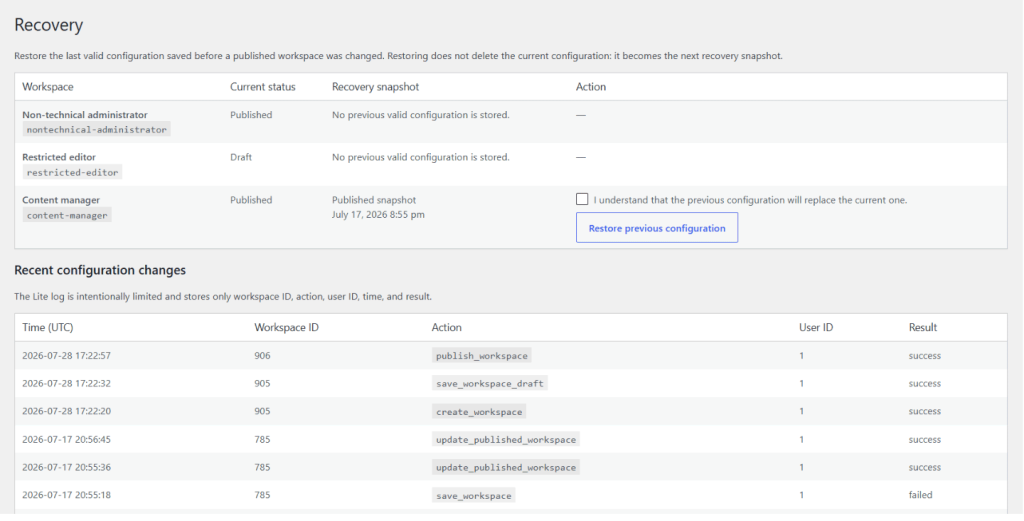
Recovery snapshots and recent configuration changes.
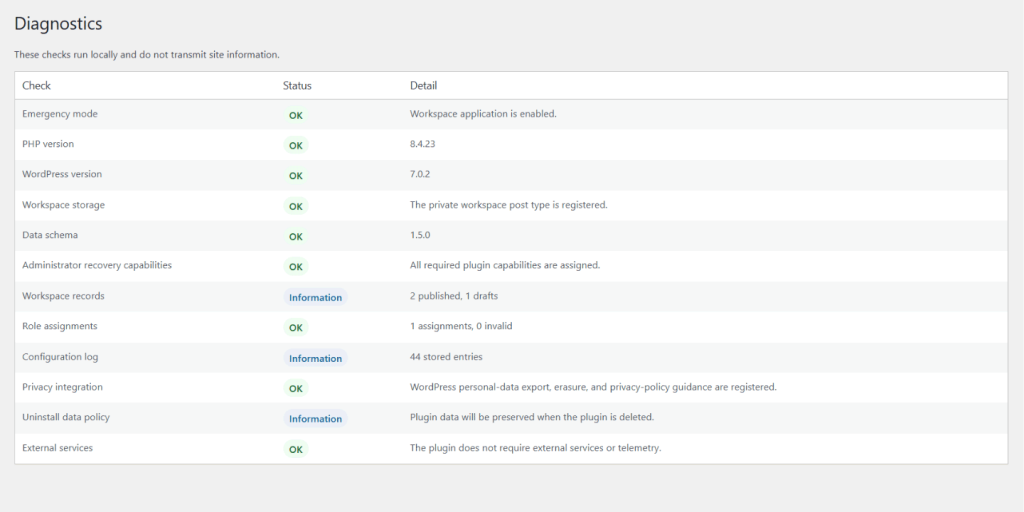
Local Diagnostics checks for requirements, storage, privacy and external services.
Lifecycle and updates
The Workspaces list supports Edit, Preview workspace, View dashboard, Duplicate, Deactivate and Delete to Trash. Updating a published workspace stores the last valid configuration as a recovery snapshot. For a major redesign, duplicate the workspace, keep the copy in draft, test it and change assignments only when the replacement is ready.
Restore a previous configuration
Go to Admin Workspace > Recovery, locate a stored snapshot, confirm the replacement, choose Restore previous configuration, then review and test the result. Restoring is reversible: the previously current configuration becomes the next recovery snapshot.
The Recovery screen retains the 50 most recent configuration changes with UTC time, workspace ID, action, user ID and result. It does not record IP addresses.
Diagnostics
Diagnostics runs locally and reports emergency mode, PHP and WordPress versions, workspace storage, data schema, administrator recovery capabilities, workspace records, role assignments, log entries, privacy integration, uninstall policy and external-service status.
Emergency mode
To disable all workspace application without deactivating the plugin, add this line to wp-config.php:
Eligible users return to the normal WordPress administration experience. Recovery, Settings and Diagnostics remain available to authorized administrators. Remove the constant or set it to false after correcting the configuration and completing a test.
14. Settings, privacy and multisite
Uninstall behavior
The option Permanently remove this plugin’s data when the plugin is deleted is disabled by default. When disabled, deleting the plugin preserves its data. When enabled, uninstall removes workspaces, assignments, plugin options, user assignment metadata, logs and internal plugin capabilities. Custom roles are preserved to avoid leaving users without a valid role.
Privacy and local data
The plugin stores its configuration locally in the WordPress database, does not transmit personal data to external services and does not record IP addresses. It may store workspace configuration, role or individual-user assignments, the workspace creator’s user ID, expiring role-specific menu snapshots and the user ID associated with a limited configuration log entry.
It registers suggested privacy-policy guidance, integrates with WordPress personal-data export and erasure tools and removes an individual workspace assignment when a user is deleted or removed from a site.
Multisite
Each site maintains its own workspaces, assignments, settings and logs. Network activation initializes existing sites, and new sites receive local defaults. Version 1.0.0 does not provide network-wide configuration, centralized assignment or cross-site synchronization. Repeat configuration and testing on every site unless you use an external deployment process.
15. Compatibility and current scope
Version 1.0.0 includes custom role management, guided and advanced capabilities, six editable templates, workspace lifecycle and recovery, capability-aware dashboard blocks and quick actions, administrative menu organization, three menu-observation layers, verification statuses, role and user assignments, start-page redirection, protected preview, emergency mode, local diagnostics, bounded logging, privacy integration and multisite lifecycle support.
The current scope deliberately excludes using menu visibility as security, granting access without the required capability, applying workspaces to users with manage_options, scanning all third-party source code, enabling new plugin screens automatically, network-wide multisite management, remote accounts, telemetry, cloud storage, CDN assets, license checks and automatic user impersonation during preview.
16. Troubleshooting
A workspace is not applied to a user
Confirm that it is published and assigned, the user does not have manage_options, multi-role conflicts are resolved, emergency mode is inactive and the user has logged out and back in.
The user lands on the dashboard instead of the selected start page
A menu item is configured to show but is missing
A visible item returns an access-denied message
A hidden item still opens by direct URL
The status remains Pending verification
A stored screen is Not currently registered
A dashboard block or quick action does not appear
A role cannot be deleted
The latest workspace change caused a problem
Plugin data remains after deletion
17. Changelog preview
Before deployment, confirm requirements, Diagnostics, role capabilities, sensitive-capability approval, published assignment, start-page access, dashboard actions, rendered menu verification, direct URL behavior, multi-role users, recovery snapshot, emergency procedure and uninstall data policy.
Version 1.0.0
Initial public release of DevAgent Admin Workspace
Related resources
Use these resources to review the product, install it and request support.

DevAgent Admin Workspace
Review the product purpose, main capabilities and security model.
WordPress.org plugin page
Download the free plugin and review its installation notes and release information.

Support forum
Ask a product-specific question in the official WordPress.org support forum.
Changelog
Review the user-facing changes included in the current release.